top of page

Our ultimate goal is to help you choose best-looking photos and videos in the fastest way. For this we have adopted the best practice from Lightroom software - we implemented Picked and Rejected Heart flags altogether with Color Labels.


Color Labels and Heart Flags

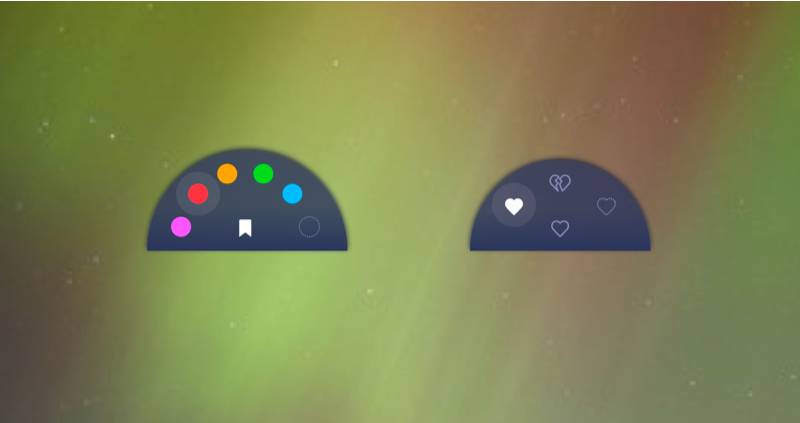
Flags are set for Media items in the Storage or DJI device Tabs. Once media items are organized, you can filter to display and work on photos that you’ve labeled with a particular flag or a particular color label. Also, you can use Quick Tools (such as Download Picked Media or Delete Rejected Media) to streamline your organization workflow.


Organize Media in the Previewer

Do the following:

  • In the Storage or DJI device Tab enlarge photo or video;

  • Tap and hold on the Heart icon or the Color Label icon and choose the needed flag or color label;

  • Swipe to the next item and apply new Heart flags and color labels if you wish;

Organize Media in multi-select mode

Do the following:

  • Select multiple items in the grid;

  • The bottom panel contains available actions. Tap and hold on the desired action to apply flags or labels all at once;


Heart Flag states and Color Labels are not saved to file itself. They are not visible or available outside of Sync for DJI.

Geek fact: Sync for DJI contains database where we store all meta information regarding each ever available media file on your DJI devices(drone and Osmo).


How to filter the grid with a particular Flag or a Color Label

Do the following:

  • Open the Filter screen;

  • Choose needed Color Label(s), Heart Flag(s);

  • Tap on Apply;

  • Now the grid displays only filtered photos and videos.

Also, you can filter by Media type: Video, Panorama, Photo, and so on.

Note: To reset Filters - open the Filter screen and tap on SHOW ALL in the top right corner.


How to use Quick Tools

Do the following:

  • Open Main menu;

  • Choose desired Quick Tool;

For more information about Quick Tools - please, read this article.


To use custom watermark feature you need to update your app to 2.0.1 version. Open iTunes -> Updates or tap here.

Watermarked image

If you're putting photos online on Instagram, Skypixel, etc. and want to protect your rights to those images or sign them, the best way to preserve digital images is by watermarking them.


With a digital photo, a watermark is a soft logo or word(s) superimposed over the top of the picture. The purpose of placing a watermark on your photos is to limit others from attempting to copy and use the photo without approval.


If you use a watermark that's too small or faint, someone could easily crop or edit the watermark and take the photo. And, if the watermark is too large or dark, it will dominate the picture, compromising its appearance.


To place the watermark on your photos, follow these 4 steps.


1. Find the app to create your watermark. We suggest use:


A+ Signature. You can add a watermark or an annotation. Available through the AppStore.


​Marksta. You'll have a surprising number of options for customizing your watermark how this app can create watermarks. Available on the AppStore.


These apps will export png image with transparent background. Save it in Photos app.


2. Open Sync for DJI app, go to Settings -> Share Settings -> Custom Watermark.

(use this link if you read this article from iPhone and Sync for DJI is installed)


Settings -> Share Settings -> Custom Watermark

Pay attention to only users who use PRO version of Sync for DJI can add custom watermarks to photos.


3. Tap on Set a New Watermark -> Choose Image and find your image that you just saved from apps above or uploaded to own library manually from other sources.

You will see how your watermark looks on light and dark backgrounds.


Set a New Watermark -> Choose Image

4. Then choose photos or video that you need to watermark and tap on Save to Photos or Share button. Sync for DJI prompts you place watermark to one of four corners. Choose the best place and tap on Save to Photos/Share.


You only need to watermark media that you will publish in social networks or something like that, where others can easily download them. So don't feel like you have to watermark every photo you have ever shot. Instead, save yourself some time by only picking specific images for watermarking.

Then publish your photos where you want. All exported images will be watermarked.


Watermarked photo. Me family on a bridge.

P.S. For comments and feedback you can find same post on Facebook.


Brief explanation:

Tasks panel allows you to see progress in your downloads, time estimation for active actions, and completed requests, such as Save to Camera Roll, Share (so as Stitch Panorama, Create Quickshot video and so on).


Tasks (items in the queue) are PAUSING whenever you pull the USB cable or turn off DJI drone or Osmo. However, items are automatically resuming once the connection is re-established with the same device and the same micro SD.


Illustration 1. Tasks Panel in the action

Let's get deep into Tasks:


Download and processing of media from DJI device is not ultra-fast. Also, we allow downloading while you are continuing to organize footage or while an app is working in the background. That's why we developed a special panel where you can keep track of all your requests. As soon as you start downloading photos or videos - the app immediately creates the task and places it on this screen.


You can access panel with the Tasks at any time just pulling Tasks tag, located on the right side of the screen. The tag itself displays current progress and estimation of the remaining tasks.


Tasks are divided into sections presenting DJI device or devices (if you link multiple). Each section contains device name, connection status, battery level and actual progress with the estimation. Also, you can open a context menu for the section and cancel tasks (or remove completed tasks).


Note: "Storage" section is used when you perform Share actions for media items already transferred to App Storage.


Tasks are auto resumable and if you want to finish download later or swap battery, or connect another DJI device - once you establish link again - Tasks will resume from the point they've been stopped (at this point, we hope you are impressed :)). Moreover, they are running even if you minimize Sync for DJI - the app maintains the connection with the drone/Osmo while there are things to download. You'll be guided with push notifications about milestones or changes in the downloading queue. For the best asynchronous results, we use Location service (read more about it here).

Protip: download multiple media items from DJI device using Multiselect Mode. In this case, selected files will be combined into one task.


Each task has context actions once it is completed. Use swipe to the left on item row (iOS) or long tap on a row (Android). You can Share to other apps or hide task.


Note: Successful tasks (if they do not require further action) will be erased from the list after the next launch of an app.


Estimation of the remaining time:


Starting with iOS 12.1 - we use prediction algorithms altogether with machine learning to estimate how much time is required for pending Tasks. We also calculate how much battery will be drained. You'll see a warning icon on Tasks tag in case of such a situation. Estimation is unique to each DJI device and mobile device you use for synchronization and requires some time for the calibration.


bottom of page